


If you’ve chanced across this post you may be looking for a way to set up conversion tracking for your Hubspot forms in Google Analytics. Here is a simple way to accomplish this – however the first thing to note is that following method only works if:
- You’ve created the Hubspot form within the Hubspot form builder – which you are embedding in your website
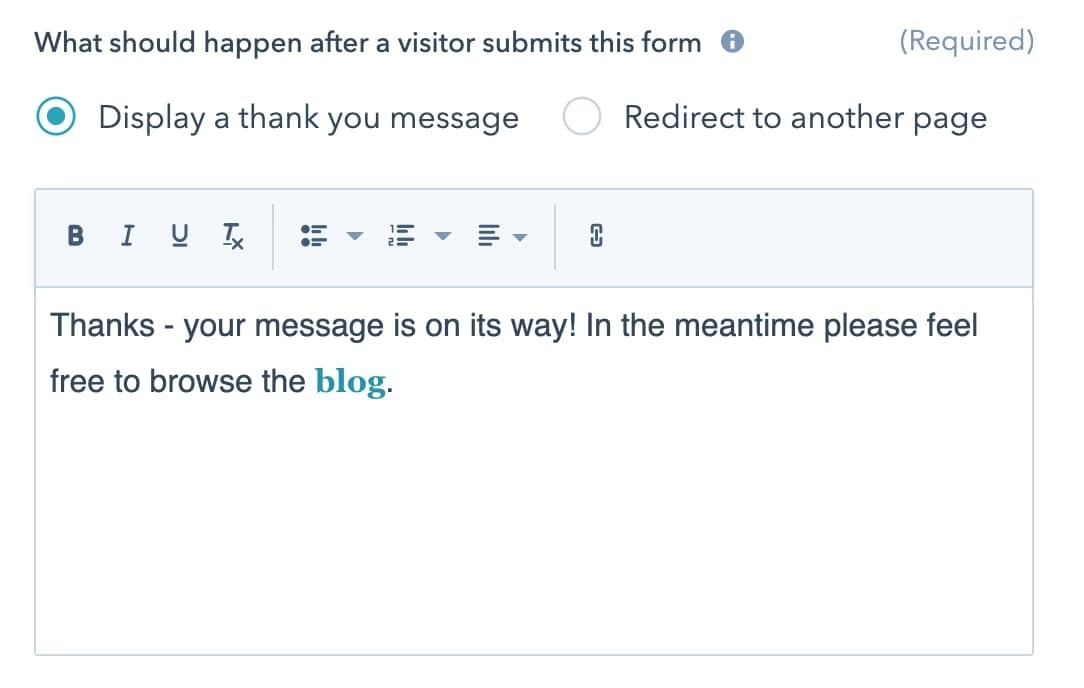
- Your Hubspot Form displays a thank you message (it does not redirect to another page)
- You are using Google Tag Manager in conjunction with Google Analytics (both are already set up on your website and working)
If the above 3 conditions apply then the following 5 steps are an easy method to track conversions in Google Analytics.
STEP 1: In Google Tag Manager: create an HTML tag that listens for Hubspot’s form submission success event
- In main workspace click “Tags”
- Create new Tag
- Select “Custom HTML” as the tag type
- For the tag name us:
Forms - HS Success Listener - Copy paste the following custom HTML script
<script type="text/javascript">window.addEventListener("message", function(event) {if(event.data.type === 'hsFormCallback' && event.data.eventName === 'onFormSubmitted') {window.dataLayer.push({'event': 'hubspot-form-success','hs-form-guid': event.data.id});}});</script> - Click to add a trigger and select the “All Pages” trigger
When done it should look something like this:
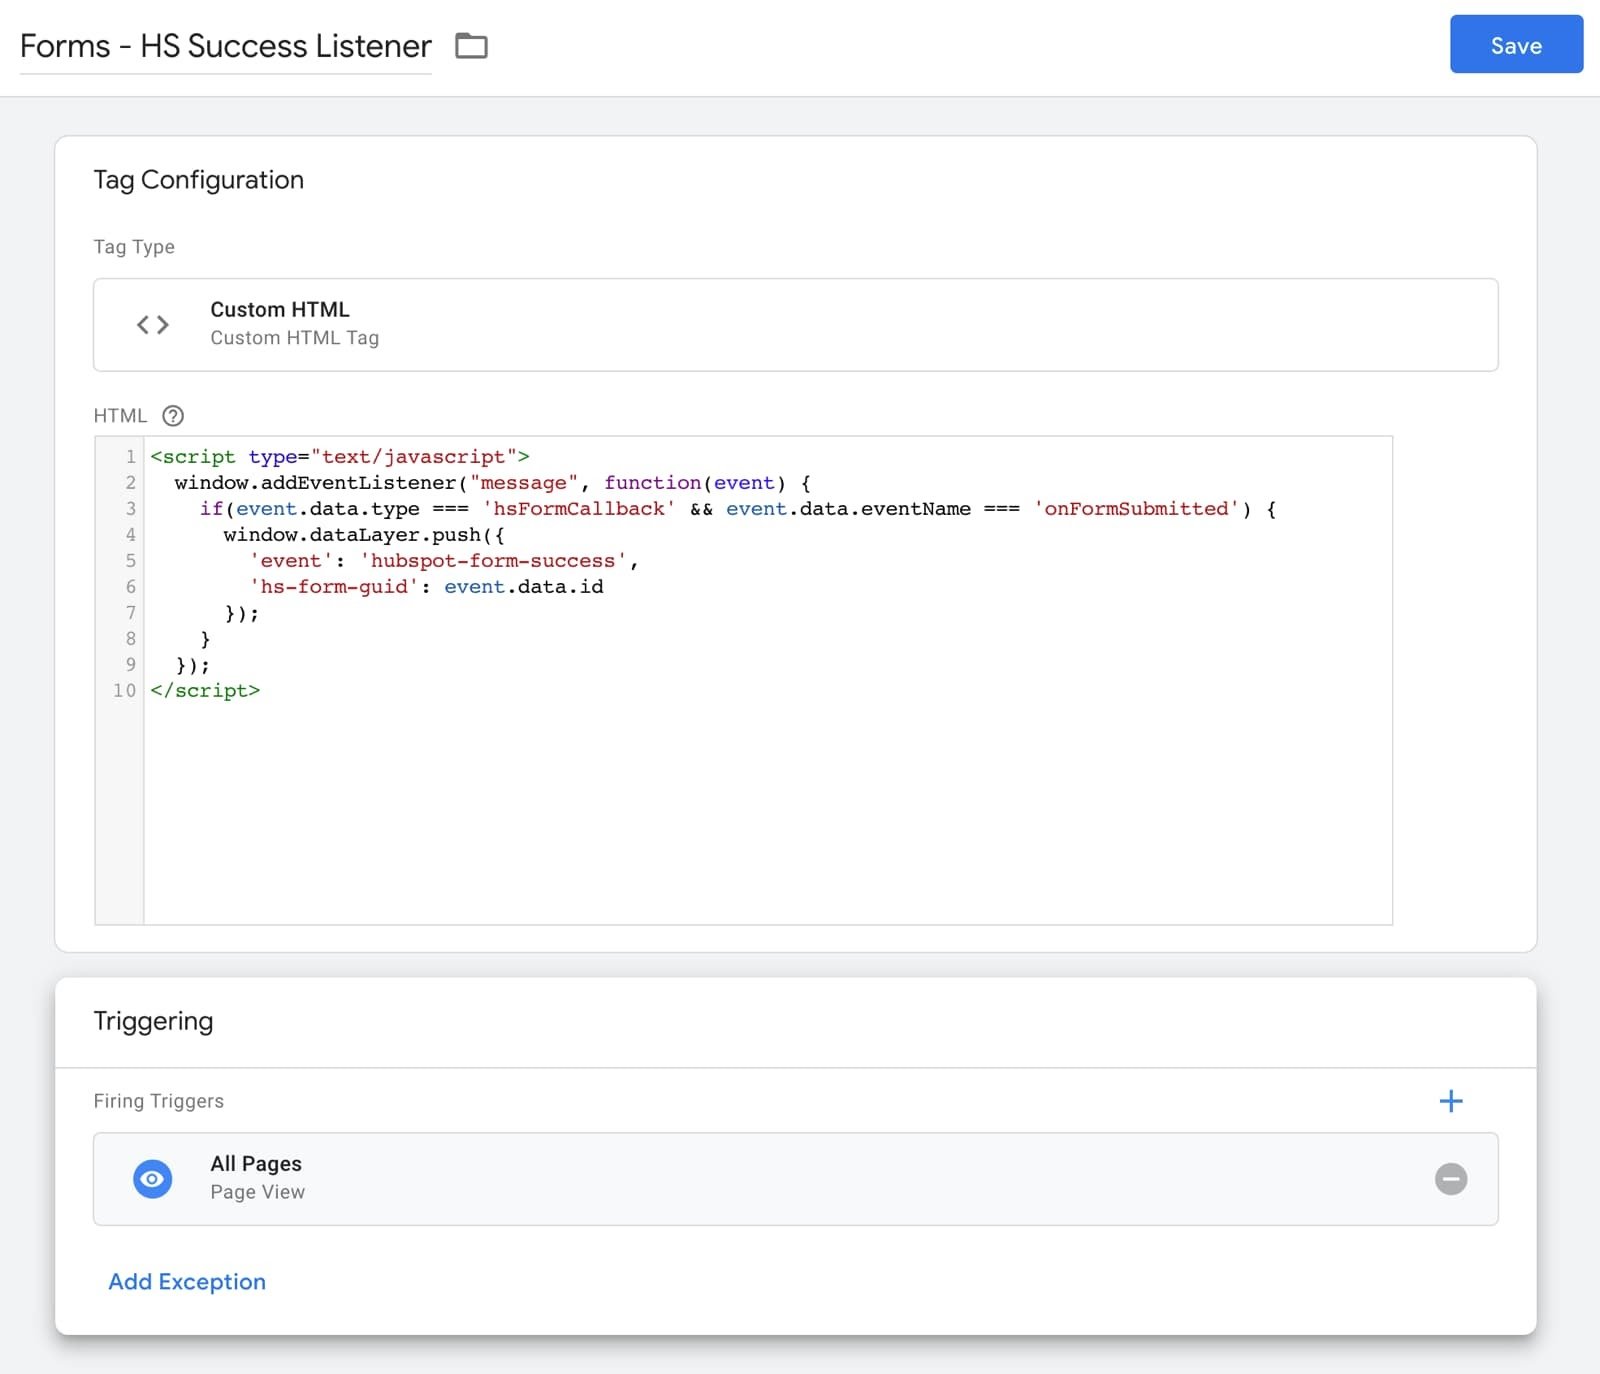
Click to save.
Step 2: In Google Tag Manager: Add a Data Layer Variable to find and capture the form’s Globally Unique Identifier (GUID).
- In main workspace click “Variables”
- Create a new User Defined Variable
- For variable type select “Data Layer Variable”
- For the data layer variable name use:
Forms - hs-form-guid
When done it should look something like this:
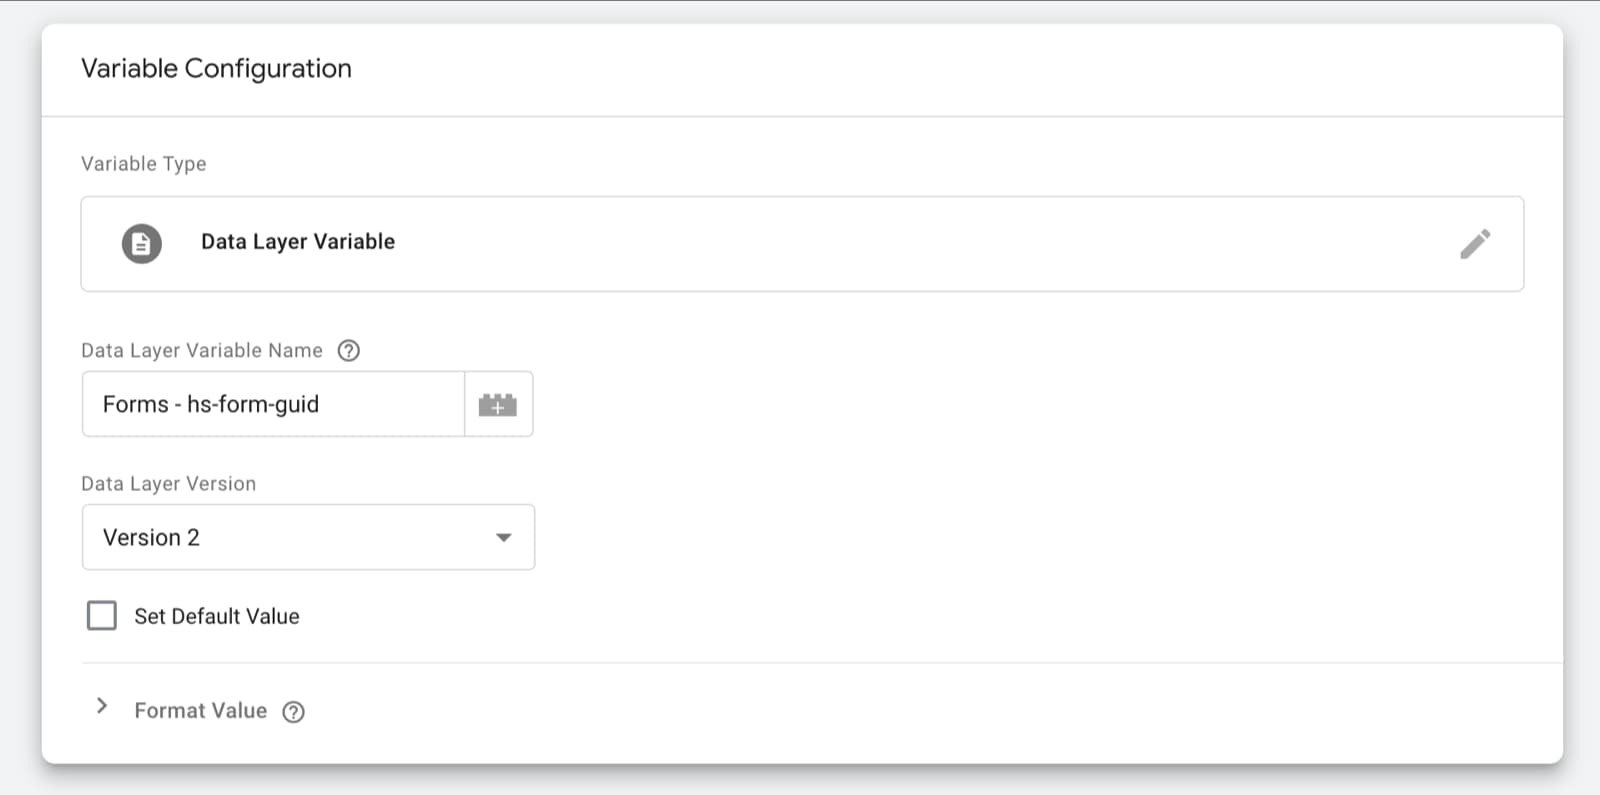
Click to save.
PS. To learn more about Hubspot’s form GUID click here
Step 3: In Google Tag Manager: Set up a Custom Event Trigger
- In main workspace click “Triggers” and add New
- Name the trigger: Event – hubspot-form-success
- In the Trigger type select “Custom Event”
- For Event name enter:
hubspot-form-success - Set the trigger to fire on all custom events
When done it should look something like this:
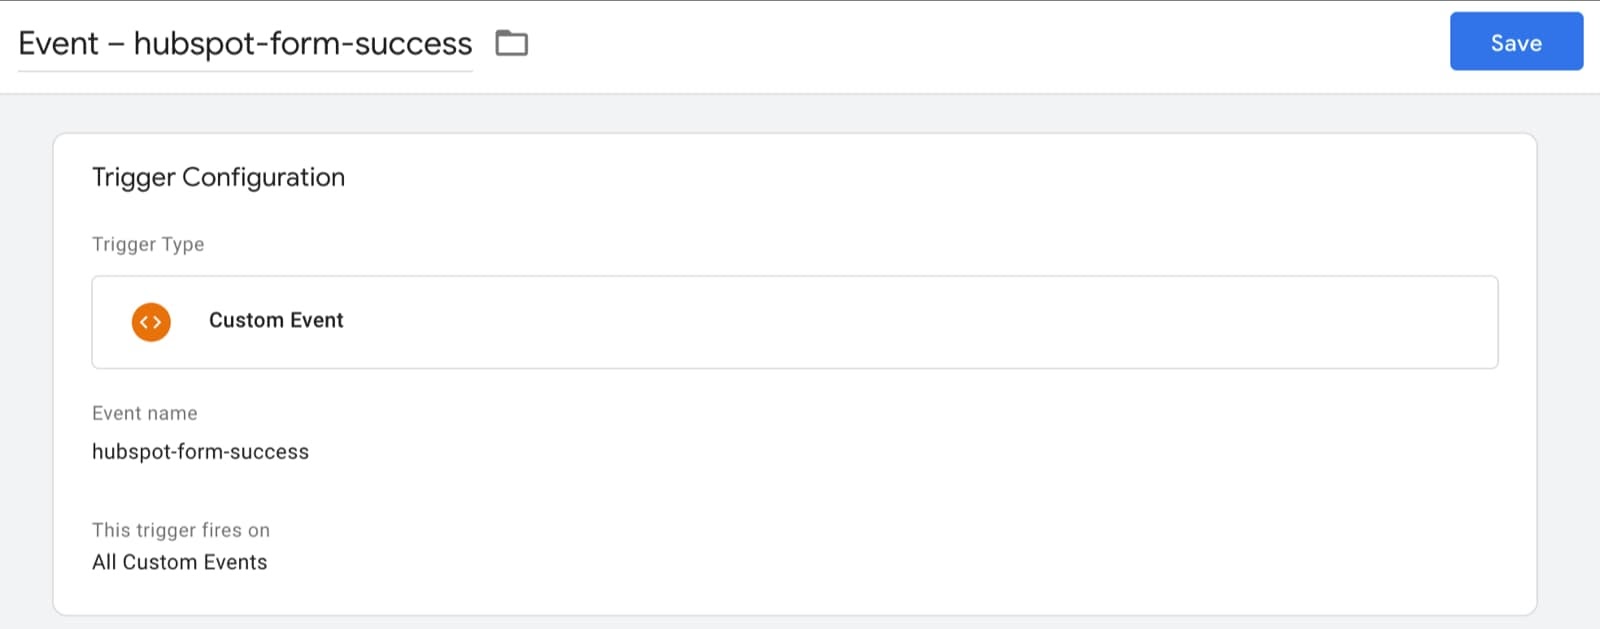
Click to save.
Step 4: In Google Tag Manager: Set up a Google Analytics Tag
- In main workspace click “Tags”
- Create new Tag
- For Tag Type select: Google Analytics: Universal Analytics
- Tag Name: GA Event – Hubspot contact form submitted
- Track Type: Event
- Category: Contact Form Submission
- Action: successful-form-submission
- For Label click and select the data layer variable you created earlier:
- Click to add a Trigger and select: “Event – hubspot-form-success”
When done it should look something like this:
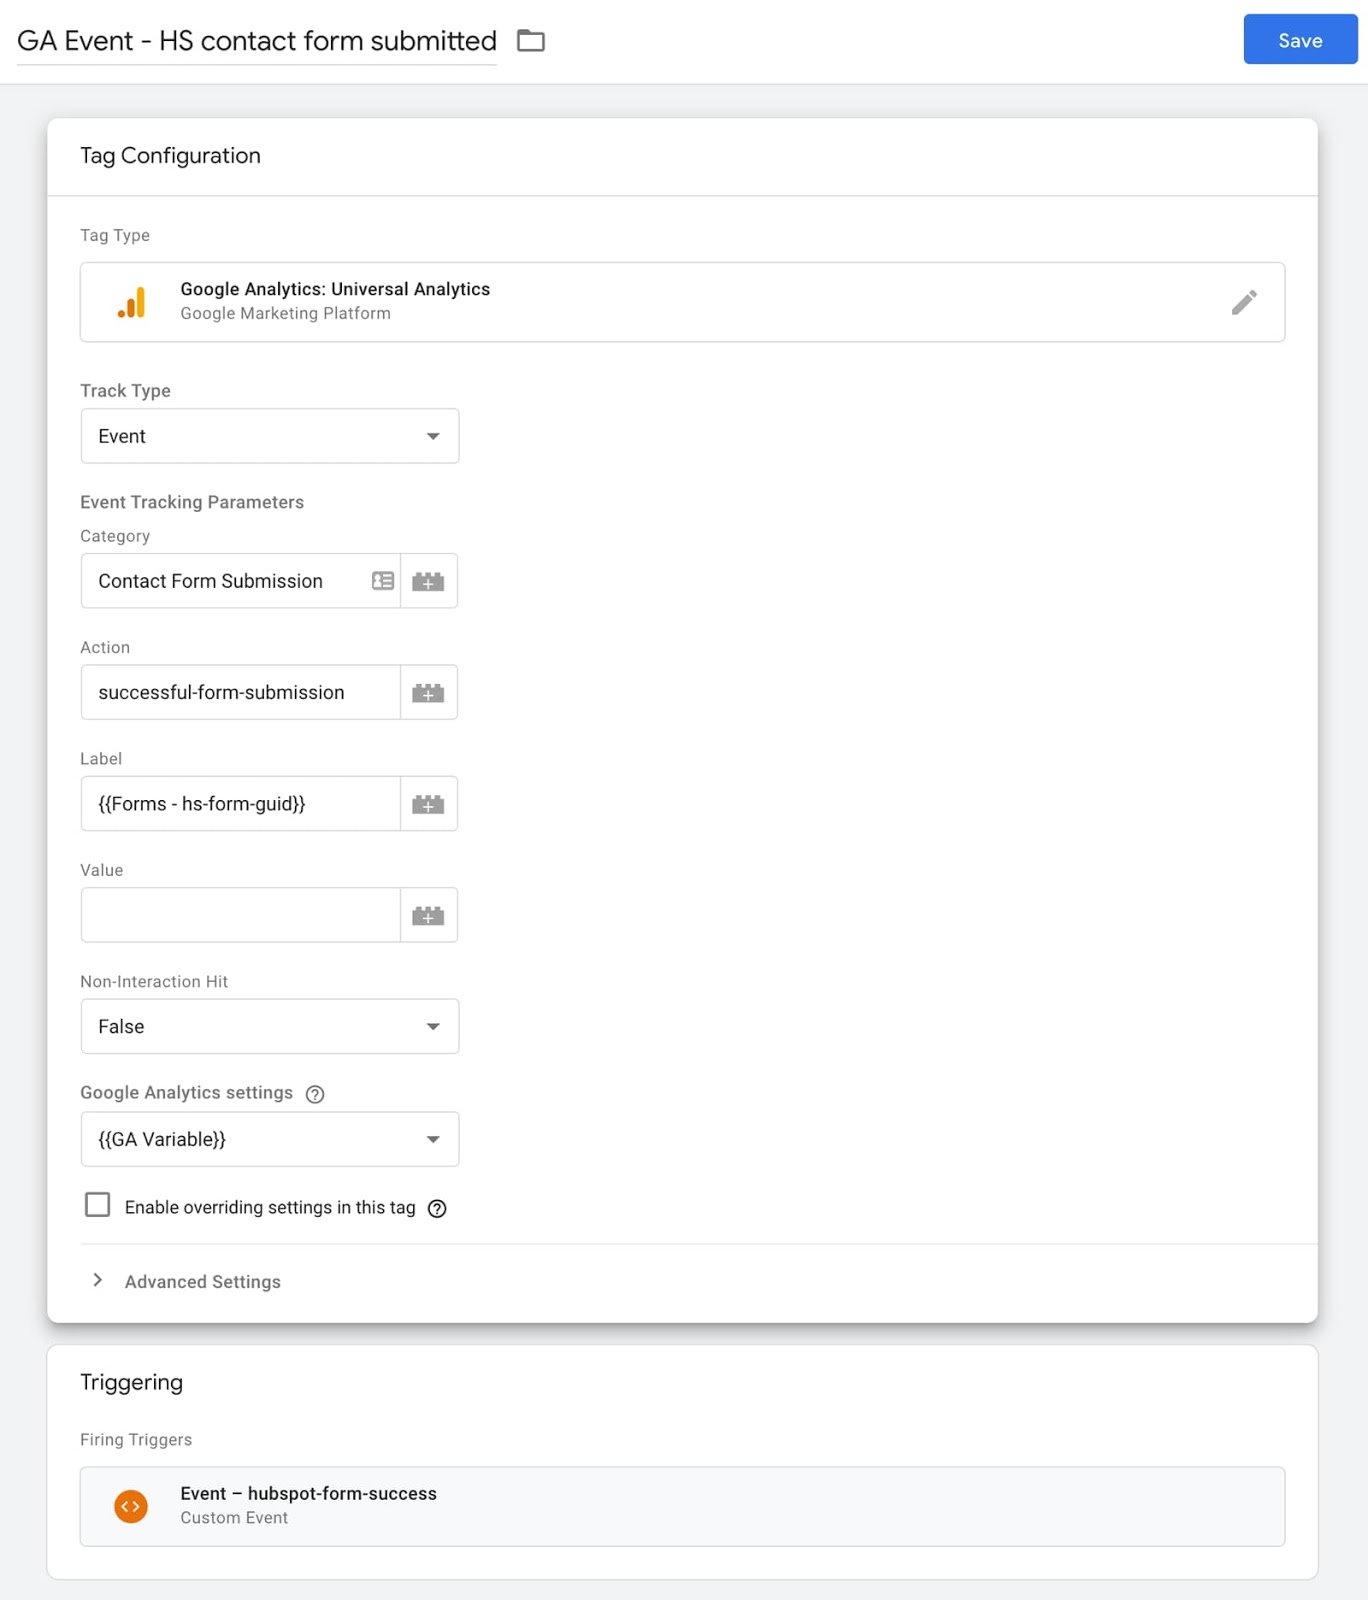
Click to save.
Step 5: Test form submission and publish GTM container
You can now proceed and publish these changes to your GTM container. However, prior to publishing it is always useful to enter “Preview” mode on GTM and then navigate to your page where your form is situated to test. Complete the form and submit – you should see the tags you created in the steps above firing.
For example:
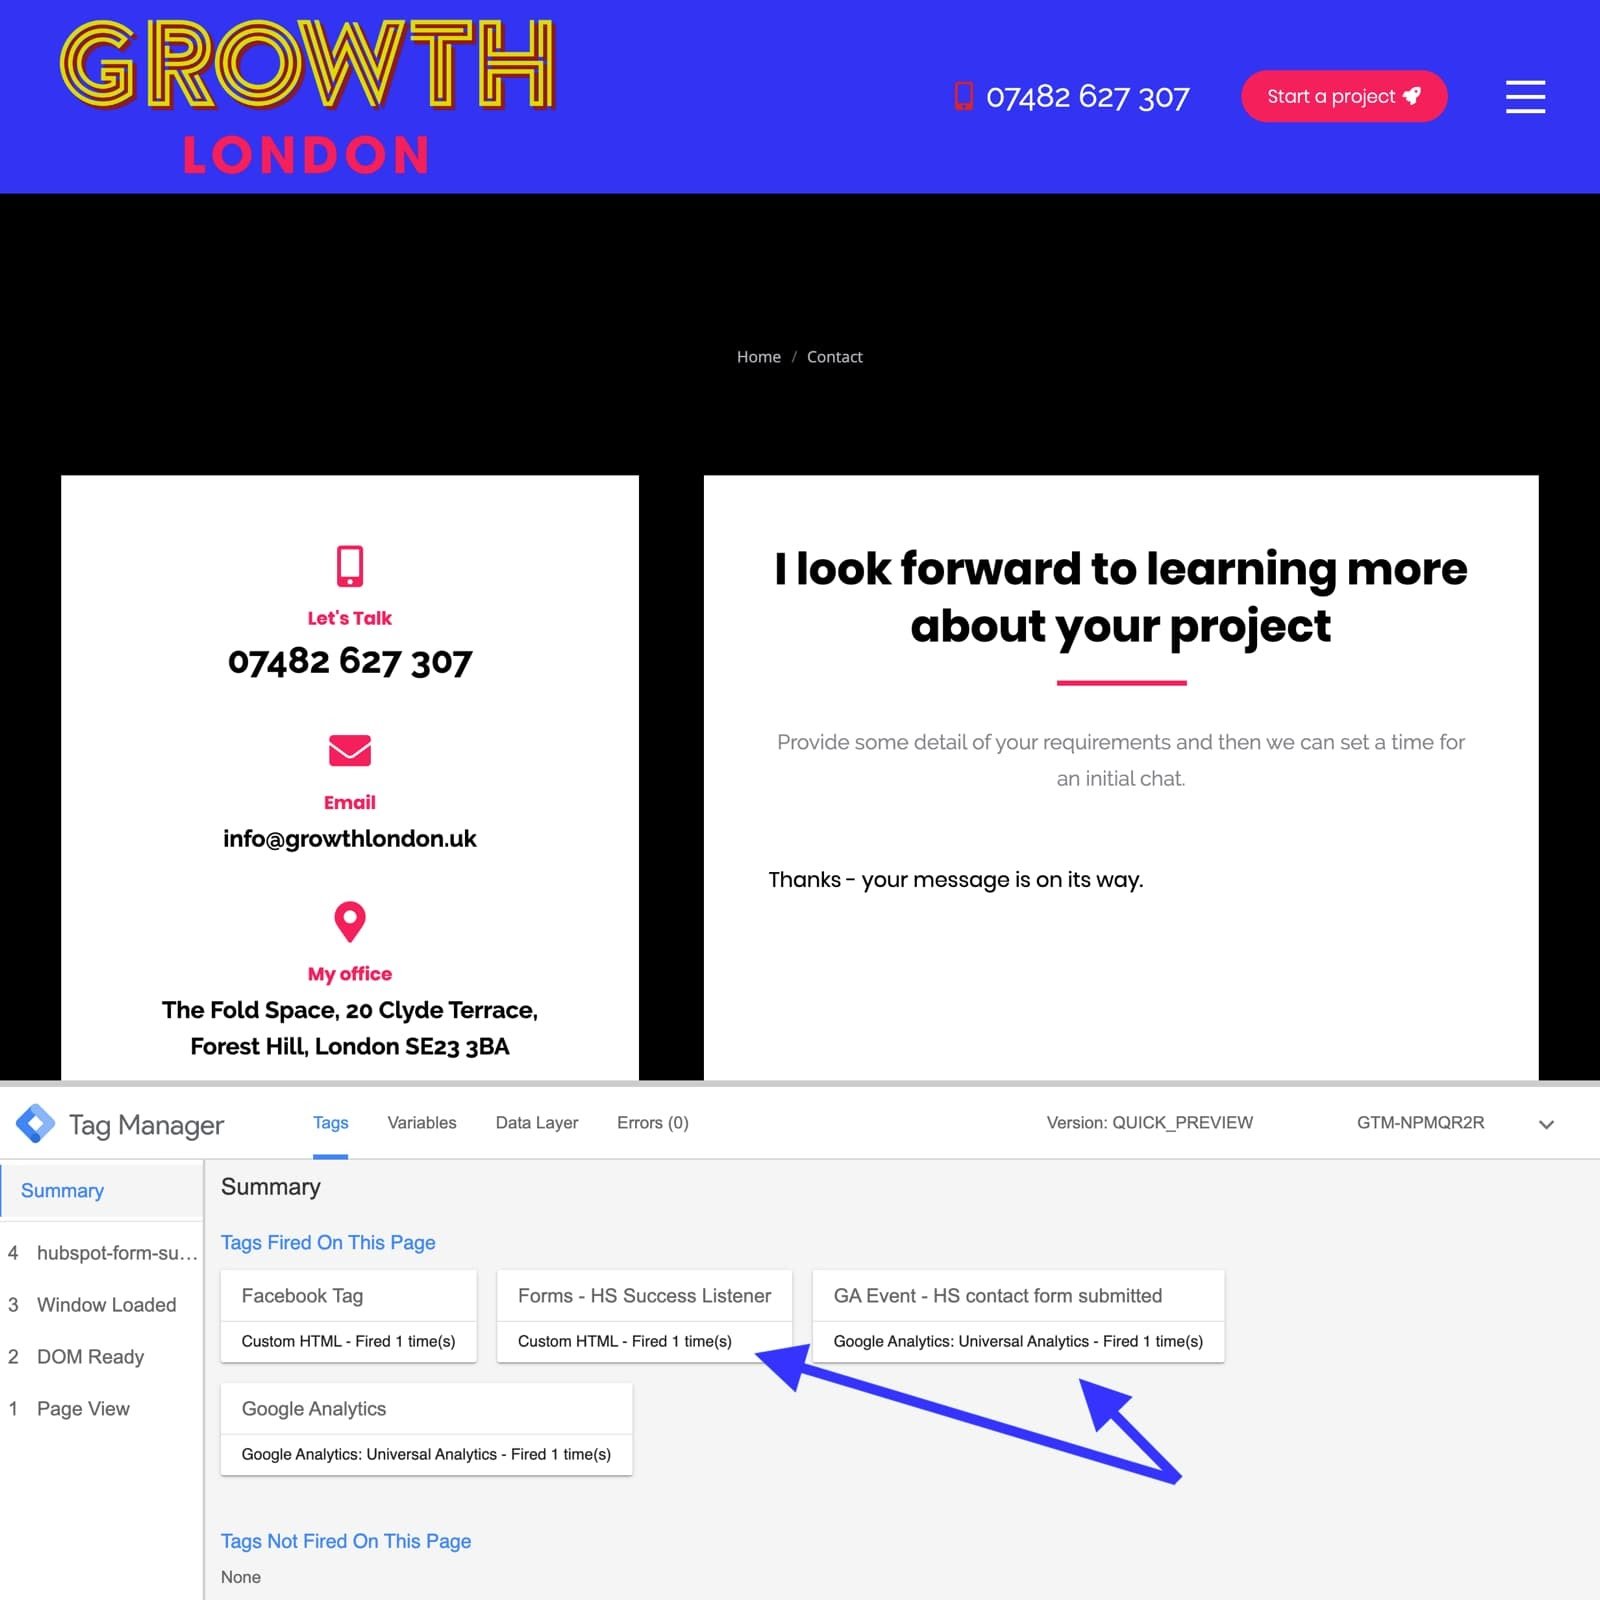
GTM Preview mode – testing form submission
Step 6: In Google Analytics: Create a goal that shows a conversion whenever the form is submitted
This will allow you to see in Google Analytics whenever the GA Event Tag (that you created in Step 4) fires.
- Admin -> Goals -> New Goal
- Goal Setup = Custom
- Goal Description: give a name – in my case it is for the contact form so I called the goal “Contact Form is submitted”
- Goal Details:
- Category: equal to: Contact Form Submission
- Action: equal to: successful-form-submission (note these must match exactly what you entered in Step 4)
When done it should look something like this:
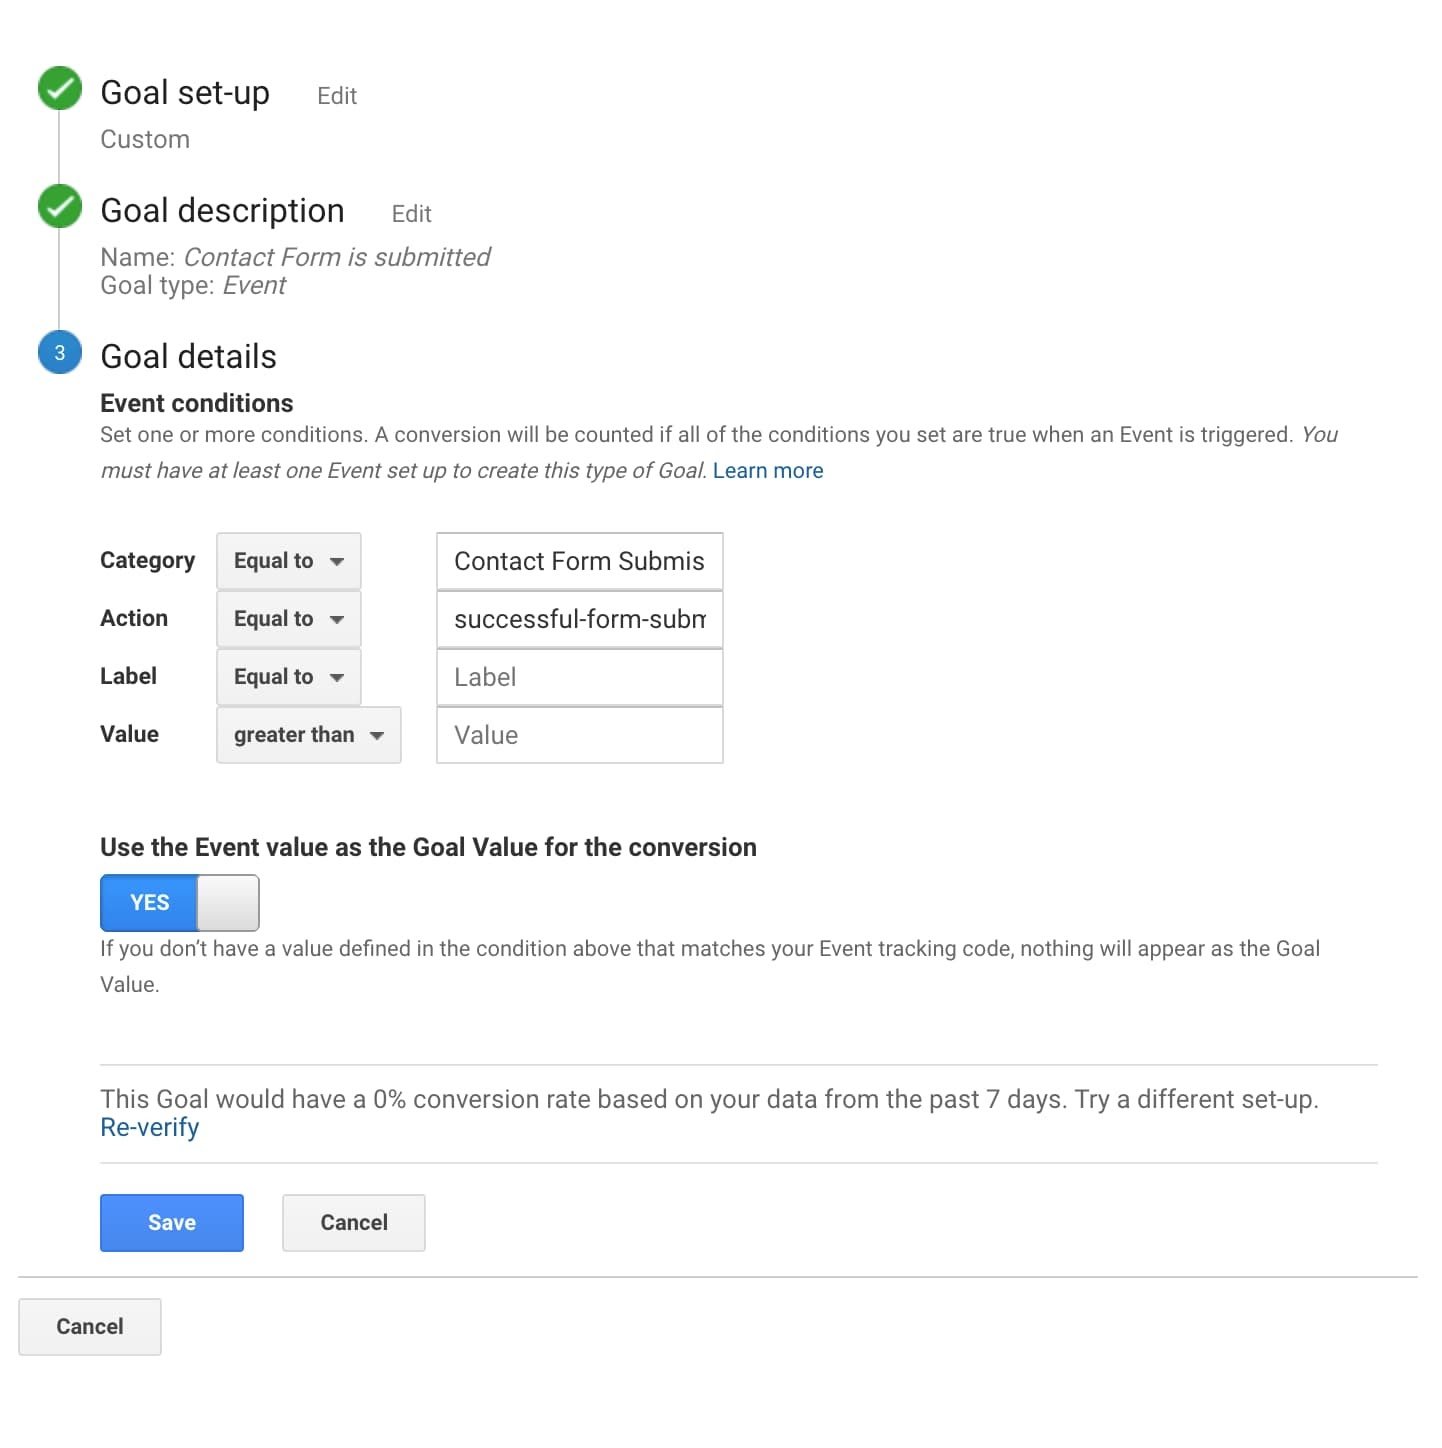
Click to Save.
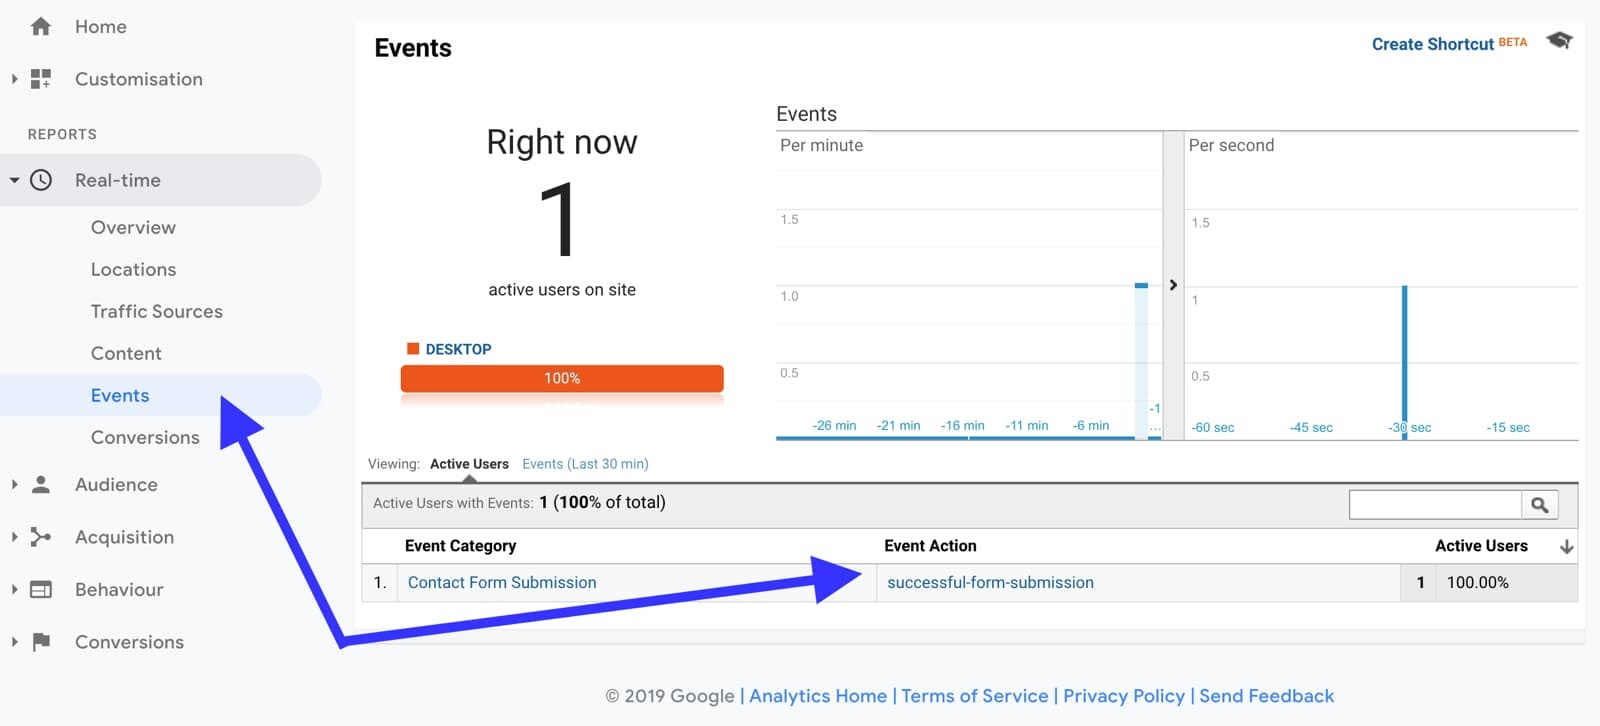
If you then go to Google Analytics Live View and then refresh and complete the form again you should have a successful conversion picked up in GA.
Hope that was helpful and that it is all working nicely for you.

.jpg?width=352&name=Let%E2%80%99s%20talk%20about%20conversion%20rates%20(Lead%20to%20SQL%20vs%20MQL%20to%20SQL).jpg)
